Posts tagged 'Go Outdoors'

Review – Montane Lite-Speed H2O Jacket – First outing

Posted by on November 11th 2011 in My reviews, Shiny new kit, Testing for review


This jacket has been supplied on a "review-and-keep" basis by Adam Smith, representing Go Outdoors. It's the Montane Lite-Speed H2O, the Go Outdoors link is here and the Montane link is here.

I would have given it a proper "on the hill" test some time ago but whenever I've been on the fells or out in the countryside the weather's been fine, so I've had to resort to wearing it in other circumstances.

So... this jacket is billed by Montane as "THE WORLD’S LIGHTEST WATERPROOF JACKET"... I can now confirm that it is very easy to wear, being light and sufficiently waterproof to withstand an hour's downpour while working on the garden. It coped well with the mud and sweat of some unseasonal digging, some condensation did form on the inside during the most demanding bits of manual labour but it was all dry after the mandatory tea-break.

On the plus side:

  • it was easily cleaned with a quick hose-down
  • it kept me warm and dry
  • I didn't lose it

On the minus side:

  • there are no pockets
  • the crinkly cuffs are uncomfortable and don't stop water running wrist-wards when hands are raised
  • the neighbour was giving me funny looks (but that could have been because I was digging in the rain)

Overall impression:

  • It does what it says in the sales blurb
  • I don't think it is as good as the Montane Featherlite Smock
  • I will wear it on the fellside and will report back on its performance, but I won't be gardening in it ever again
  • I don't think it's worth Go Outdoors' £90 RRP - for that sort of money I'd want pockets and better cuffs

Next time out I intend to get some pics of it in action. Today there was nobody about that I trust with my camera in the rain!

If you're in the market for a waterproof jacket, Go Outdoors have plenty of other waterproof jackets for your perusal here.

Review – Montane Lite-Speed H2O Jacket – First thoughts

Posted by on August 8th 2011 in My reviews, Shiny new kit

This item has been supplied on a "review-and-keep" basis by Adam Smith, representing Go Outdoors.

The jacket being reviewed is the Montane Lite-Speed H2O, the Go Outdoors link is here and the Montane link is here.

This jacket is billed by Montane as "THE WORLD’S LIGHTEST WATERPROOF JACKET" and who am I to argue with that claim? Go Outdoors are pushing it as a "Running Jacket", I can assure all and sundry that I'll not be running anywhere in it! No, this jacket is competing with the proofed Montane Featherlite Smock for a place on my "must take" fellwalking-kit list. Sadly I didn't get sent the Black version, but I've no doubt that this Fluoro-Yellow jacket will perform just as well.

If you want the proper spec it's best if you follow the links above, I'll add that the actual weights for the one supplied to me are: jacket 174g, stuffsac 14g (5g if you hack off the Velcro strap and plastic loop), those weights are for a size L.

Although it's a minimalist jacket it looks to be well-constructed with excellent stitch-work and taped seams throughout. The zip is a tad awkward to get moving, I reckon that it needs a bit of "running-in". The hood is basic, it has a single-handed draw-corded captive toggle system for closure but no stiffened or wired peak or anything else techie. The hood stowage is neat with three Velcro patches for keeping the collar closed, the only niggle here is that the FreeFlow H2O fabric is so lightweight that I get the feeling that it (or the stitching) will give way before the Velcro opens. It doesn't, of course. The hemline has a drop-tail and another of those excellent draw-corded closures. Cuffs are "self-fabric" which to the terminally-confused means that the ends of the sleeves are simply folded over a bit of elastic and then tube-stitched. TBH I don't like these cuffs, I much prefer the cuffs on the original Featherlite Smock which have a much better fit and feel. Aside from some reflective bits here and there, that's about all there is... no pockets, no vents and, oddly, no hanging-loop.

I had expected this jacket to be quite similar to the Featherlite Smocks that I already have but it is significantly different. Then again, it has a different job to do. I'll report back when it's been baptised, or when I've been released from custody after being arrested by the Style Police for wearing it in public.

According to Go Outdoors the Retail Price is £90.00 but they're currently in the sale at only £36.82 - perhaps it's time to get one for yourself? If that don't float yer boat, they have plenty of other waterproof jackets for your perusal here.

Oh, nearly forgot! Packed size. Many sources claim that the Lite-Speed H2O is about the size of a small grapefruit. Well, we don't do grapefruits here and so I can't confirm those claims, but I can say with no fear of contraception that it's a bit bigger than an orange, a bit bigger than an apple and quite a bit shorter than a banana...


Review – Hi Gear Pitch + Go SS pop-up tent – First thoughts

Posted by on July 15th 2011 in My reviews, Shiny new kit

This item has been supplied by Adam Smith, representing Go Outdoors.

The shelter being reviewed is the Hi Gear Pitch + Go SS (camo print), the Go Outdoors link is here and the Hi Gear link is here.

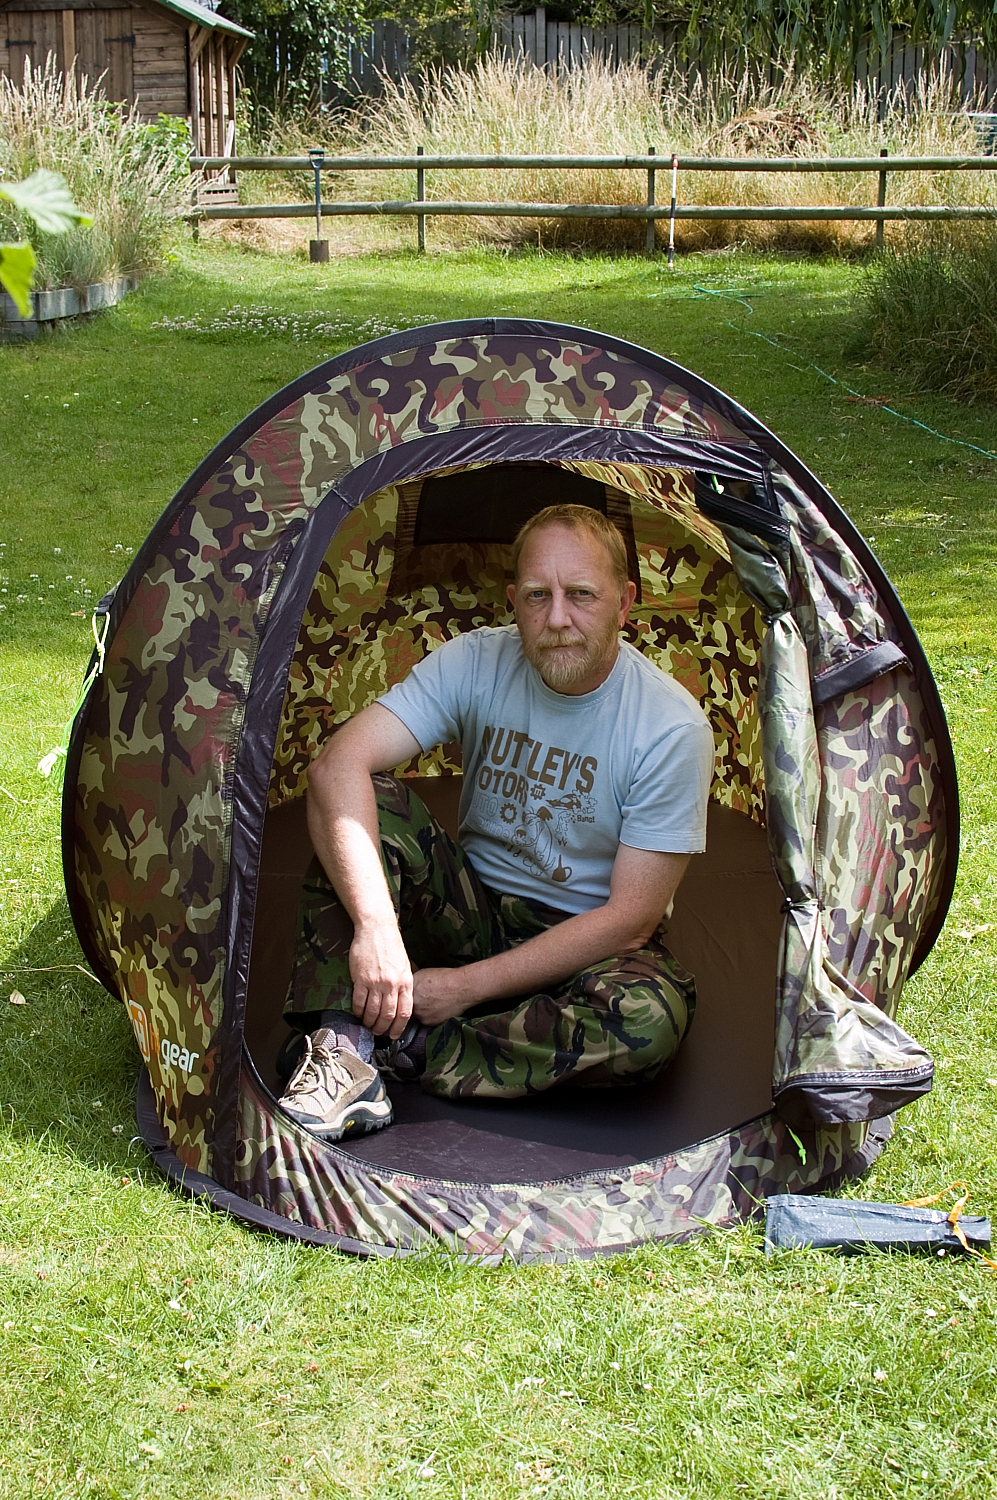
No, I've not gone mad, I don't intend to use this shelter for camping. I will, however, use it as a night-shelter for me, my low-chair and my photography kit while out snapping the night sky in winter. I'll probably use it as fishing shelter too, and possibly as a beach-tent. You could sleep in it - there's plenty of room for one, fit two into it and it would be a bit cosy, but despite the two vents there could be condensation issues as it's a single-skin construction.

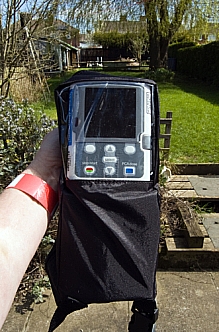
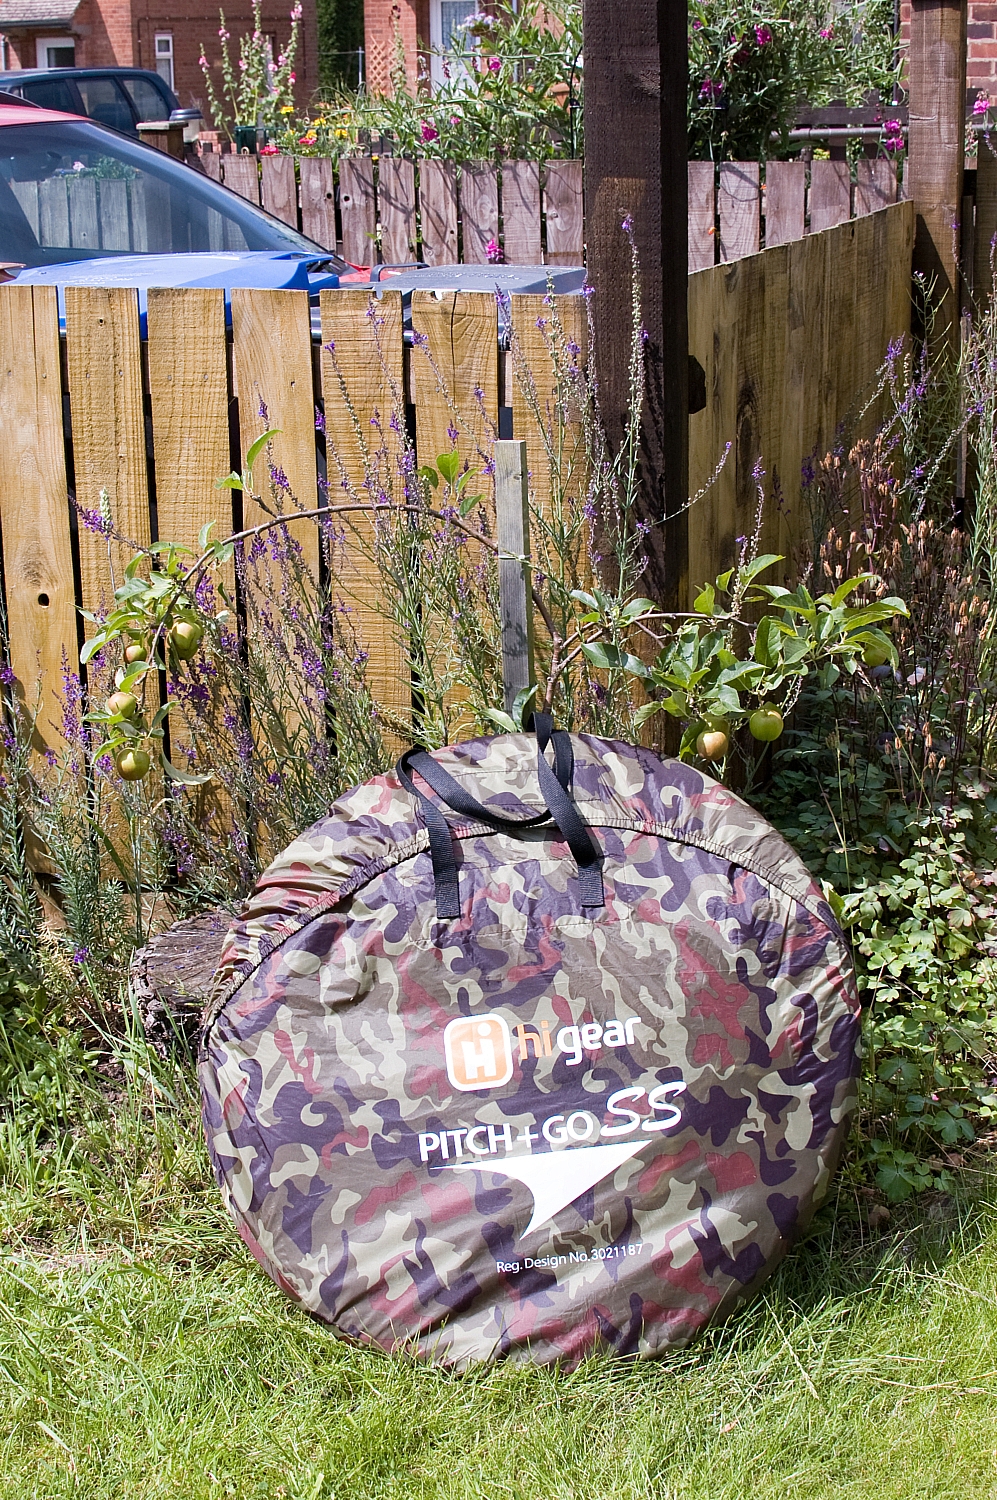
So, what do you get for your money? A bag, a tent and 10 steel pegs in a little slip-bag. That's it. Oh, and you get instructions for getting it back in the bag, they're sewn into the inside of the bag so there are no excuses for not being able to strike the thing. Things you don't get are: a spares kit, internal storage pockets, gear-hanging loops.

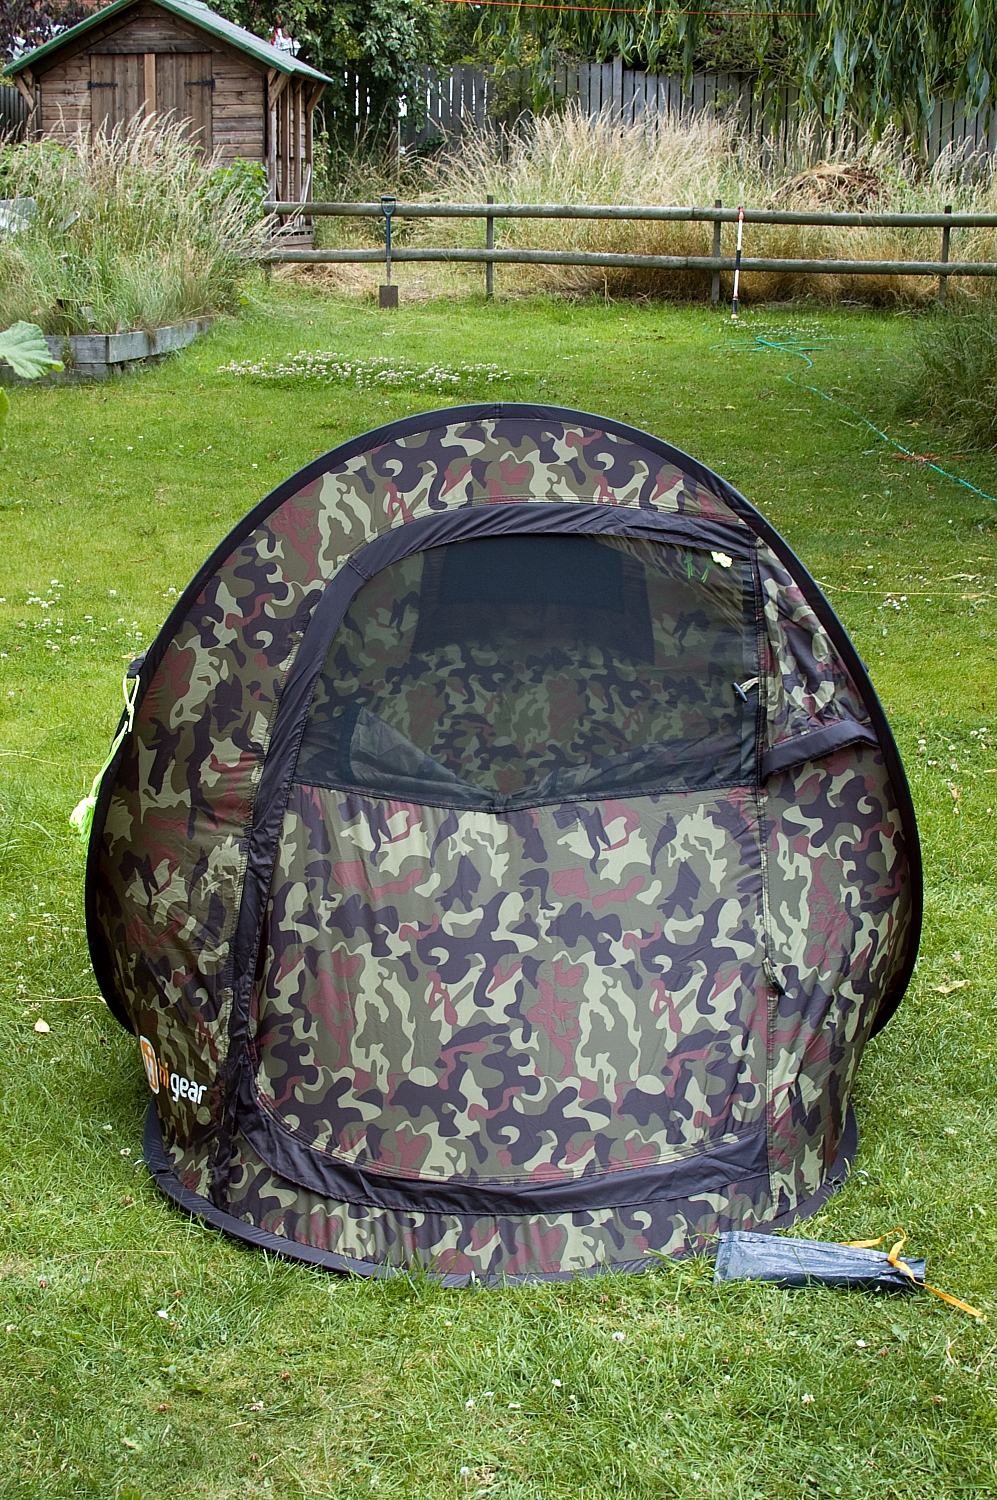
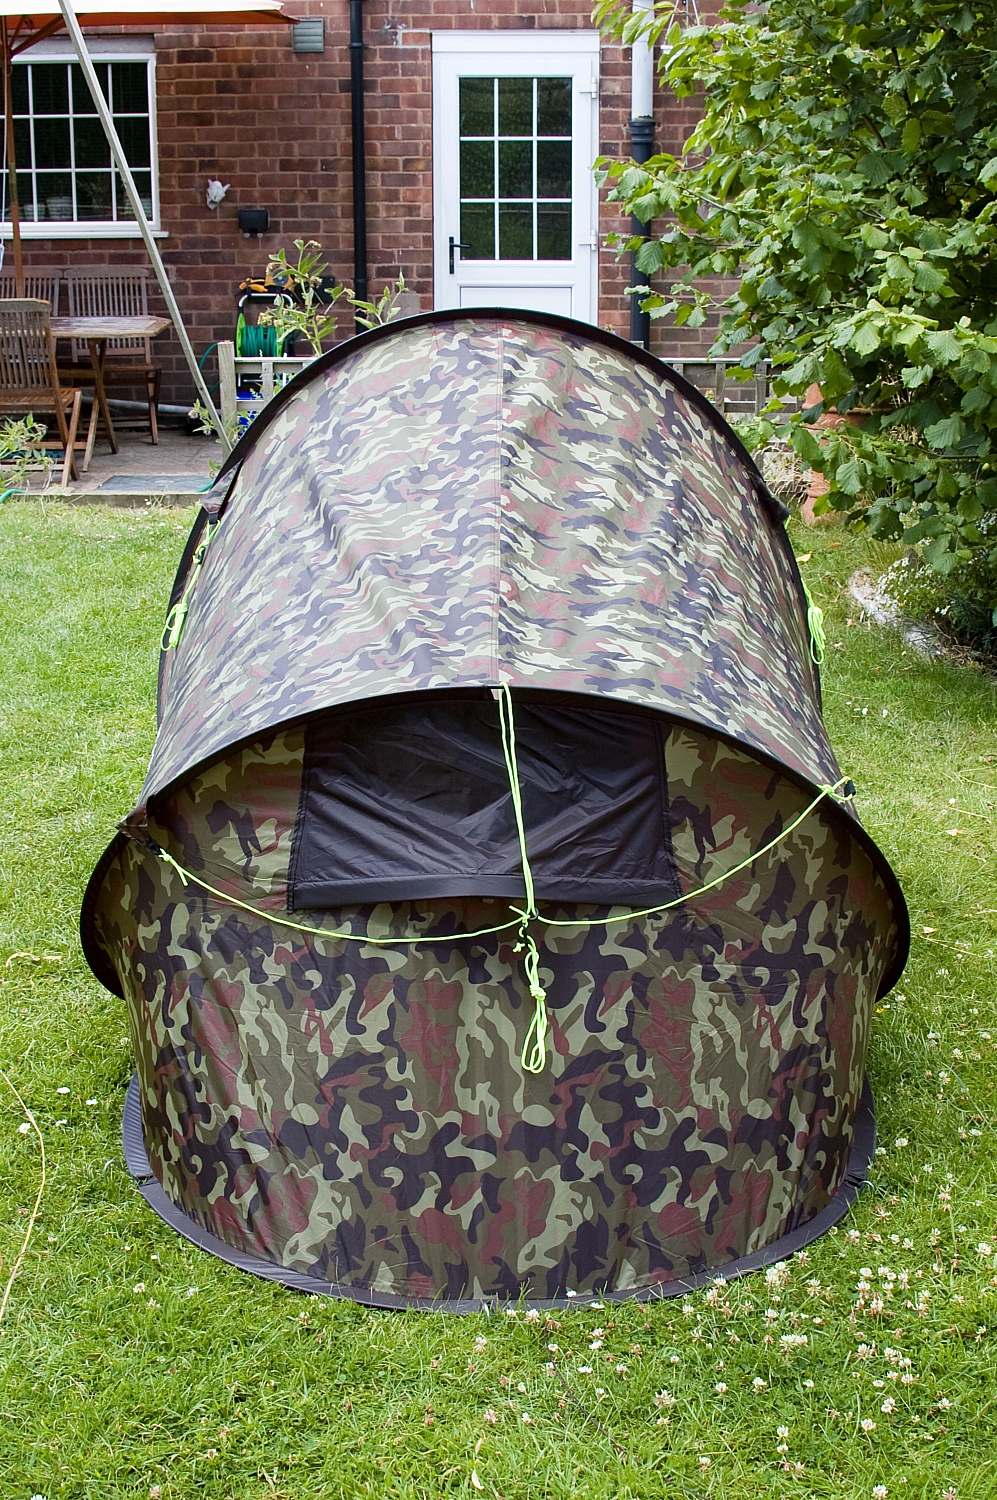
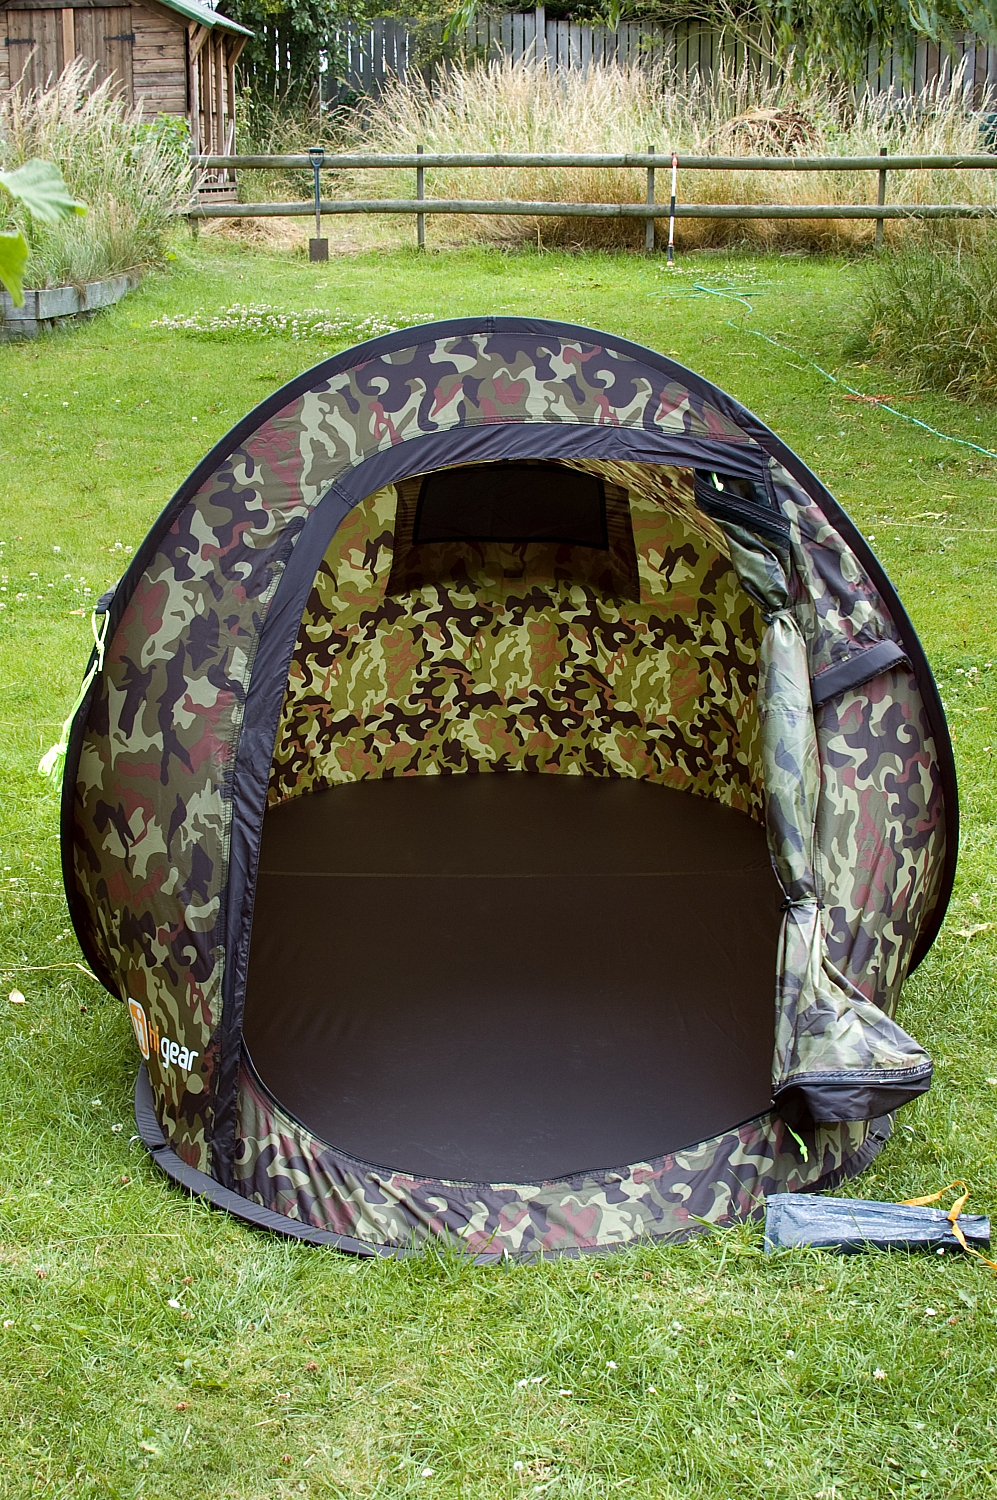
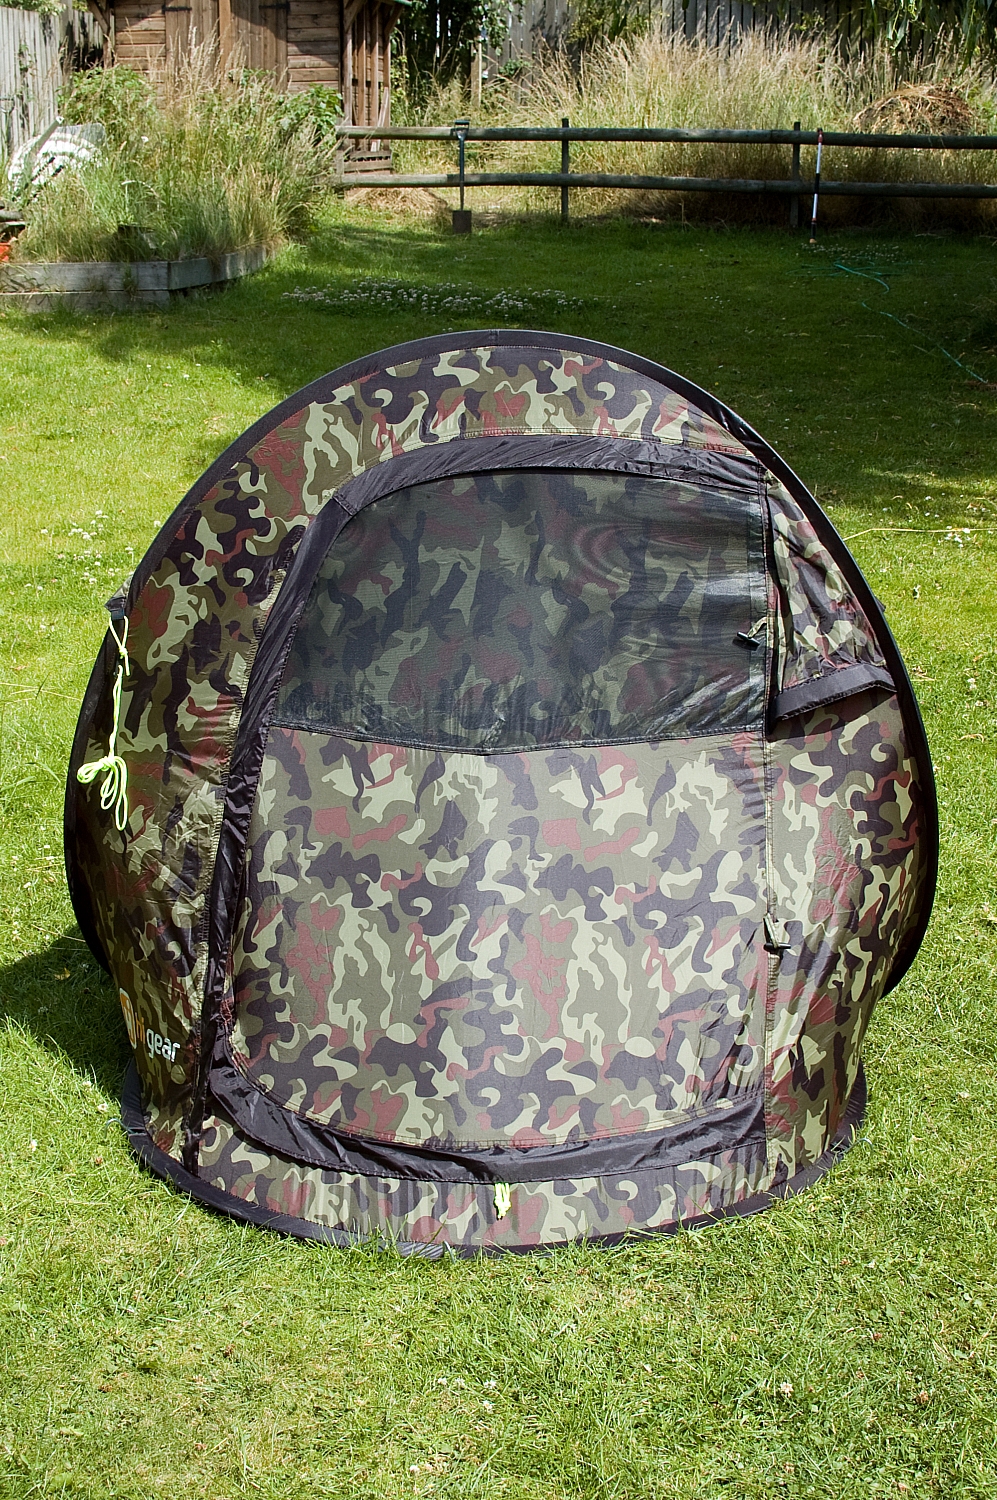
Putting the thing up is a doddle, just unpack it, pull off the integral retaining band and it pops up just like it says on the tin. There are six pegging points around the bottom edge and five guying-points so I'm either missing a peg or guying it incorrectly. No matter, I have hundreds of spare pegs and plenty of spare cord. When pegged and guyed it's surprisingly stable and copes reasonably well with a bit of a breeze. The fabric has a claimed hydrostatic head of 2000mm but I can't verify that. There's a small cowled mesh vent next to the front flap and a larger cowled mesh vent on the rear wall, the latter being held open by a Velcro strut. Both vents can be held shut by Velcro tabs. In a breeze the through-flow of air is reasonably good. The front flap is D-shaped, has a 2-way zip and two toggle/loop retainers to hold it aside when open. The front flap has a midge-net upper section which can be uncovered by letting down the zippered top section of the flap, this section has a separate toggle/loop retainer to prevent flappage. All seams are taped and the groundsheet fabric seems to be durable. The oval groundsheet is of flat, not bathtub, construction. Oddly for a camo thing the guylines are dayglo yellow, I might replace them with ODs for when I'm out on a "mission".

Wrestling the thing back into the bag is something of an art but once mastered it's a two-minute affair. The bag itself is well-constructed with an elasticated overlapping top, velcro closure and two webbing carry-handles. Both link-sites say "Easy to pitch with pre-attached guylines, this can go from rucksack to standing in seconds, so you can get on with having fun." Well, maybe... you'd probably need a 30"-wide rucksack...

Of course, camo gear doesn't suit everybody. Go Outdoors have a range of these things with a fair choice of colourways and prints so you don't all have to look like you're playing soldiers. Go Outdoors stock a range of conventional tents too - see here for details.

I measured the thing, here's the deal:

  • Total weight: 2075g
  • Height at front: 41"
  • Height at rear: 29"
  • Groundsheet max length: 88"
  • Groundsheet max width: 41"
  • Body max width: 47"
  • Packed diameter: 30"
  • Packed thickness: 2.5"

All in all it's a neat and simple bit of kit and I expect that it'll be fine for the uses that I have planned for it. I must admit that I quite like the simplicity of it. For me the only downside is that logo text that's plastered on the sides... it looks like "PITCH + GOSS"... around here, "goss" has an unsavoury meaning. Really, did nobody think that through before going to print?

Anyway, click the following to see a few pics of it pitched in the garden:


Hi Gear Pitch + Go SS (camo print)

I'll report back when it's seen some proper action, I've no idea when that'll be.

Review – Lifeventure Downlight 900 sleeping bag – First proper use

Posted by on July 15th 2011 in My reviews, Shiny new kit, Testing for review

This item has been supplied by Adam Smith, representing Go Outdoors.

The sleeping bag being reviewed is the Lifeventure Downlight 900, the Go Outdoors link is here and the Lifeventure link is here.

My "First Thoughts" review is here.

I used the bag on the recent two-night wildcamping weekend in the Lakes District and I had two nights of comfortable sleep in it in an open-fly tent in temperatures that dipped to +5C. On the same outing my walking buddy Mike was using a lightweight synthetic bag and he was cold on both nights despite being clothed and having his tent closed.

Sadly there are no new pictures of the DL900 in use in the tent - my lowly Argos Pro Action Hike Lite isn't big enough to accommodate both a laid-out sleeping bag and a photographer. I can report that the bag coped really well - it lofted fully within five minutes of being laid out, the zip didn't snag, the drawcords behaved themselves and it didn't retain any dampness in spite of its sweaty occupant. Stowing it in the neat dry-bag was easy and as I've said before it compresses to a flat shape that fits well in a pack.

I think that this bag could be used from early spring to late autumn if the user was appropriately dressed. Hopefully I'll be able to verify this later in the year.

It's worth bearing in mind that this is the mid-range Downlight bag. Go Outdoors also sell the 600 and the 1200 versions for those that need either less or more insulation. The complete range of sleeping bags on offer from Go Outdoors is listed here.

Overall verdict: Highly Recommended.


Review – Lifeventure Downlight 900 sleeping bag – First thoughts

Posted by on June 4th 2011 in My reviews, Shiny new kit

This item has been supplied by Adam Smith, representing Go Outdoors.

The sleeping bag being reviewed is the Lifeventure Downlight 900, the Go Outdoors link is here and the Lifeventure link is here.

The first thing to report is what this item's like straight out of the packaging... it's different. There's no traditional strappy compression sack, instead there's a drybag with a roll-top closure and an air-valve air-vent and stopper. The bag has welded seams and the fabric appears to be quite durable with a woven outer face and a coated inner face. Once filled, the drybag is as airtight as any other roll-top drybag - I sat on it and it didn't squeak or leak. I'm not ready to do an immersion-test on it just yet though. When I removed the stopper it was easy to expel the excess air and the contents compressed well to form a shape that would easily slip into a pack, or into a larger mesh pocket on the outside of a pack. When stuffed with clothing the drybag makes a useful pillow which fits neatly in or under the hood of the sleeping bag.


After taking out the sleeping bag and giving it a shake and a rest to allow the fill to loft, I stuck it on the lawn and took a few pics. My observations from this, and a few other notes, are listed below.


For the full spec I'd advise going to the Lifeventure site, but here are some of my observations:


  • The head-end is not cowled but it's still a nice fit around the face with the elasticated drawcord. There's also a down-filled neck-baffle with a non-stretch drawcord. Both drawcords have captive cord-grips on the side opposite to the main zip.
  • There is a small (about 5" x 4") zipped pocket on the outside and two Velcro-closed internal pockets (about 4.5" x 4.5") on the inside - one near the chest, one near the ankle.
  • The 2-way main zip is unbranded but seems to be the same as the YKK zips in my other sleeping bags. The zip opens 3/4 of the way across the foot end which allows for the user to sleep with feet out of the end (rather than out of the end of the side). It also allows the sleeping bag to be opened fully for use as a blanket. The zip has a corded pull-tag on the top puller and there is a Velcro-closed puller cover at the top end of the zip. The full-length down-filled zip-baffle has a woven anti-snag strip.
  • The foot is oval, allowing the user's feet to fit without restriction (but if you've got absolutely huge feet, YMMV).
  • There are two pairs of hanging-loops at the foot end - one pair inside, one pair outside.
  • It has single-layer box-wall construction with a lightweight ripstop outer and a Tactel nylon and micro polyester inner. The stitchwork is good - I've found no bad bits and no loose ends.
  • The outer fabric has "Ex3" treatment - see the Lifeventure website for details of this.
  • The fill is "high quality duck down", I've yet to find a proper fill-power figure in the blurb but the swing-tag says that there is 300g of the stuff in there.
  • The claimed length and widths are about right.
  • The claimed weight is 900g, I measured this one and found that the sleeping bag weighs 970g, the drybag adds another 110g. It's worth noting that with the drybag, unlike when using a standard compression bag, no additional waterproof outer bag is required.
  • The claimed "packed size" is obviously dictated by the drybag length and width, I managed to compress the filled drybag to an average thickness of 3cm with ease. I'll try the sleeping bag in a standard compression bag sometime soon and report back with the critical measurements.
  • Compared to other "mummy-shaped" sleeping bags this one has more width in the leg area, this makes it quite easy for the user to move around inside it.

All things considered, this looks like a nice bit of gear and I hope it performs as well as it looks. I was tempted to set up a tent in the garden so I can give this kit a night out, but I've been told that I'm too busy this weekend. Next week, maybe?


UPDATE (7th June, 2011):

I knew that there was something bugging me about what I'd claimed to be an air-valve on the drybag. Eventually the penny dropped and I realised that it's not a valve at all - there's no diaphragm in there. What I looked at and thought was a diaphragm is actually an internal baffle-plate to prevent the fabric of the bag from being pushed through the hole during compression - think of the cargo-hold window scene at the end of Alien Resurrection and you'll get my drift. Without the stopper in the hole, air can flow in or out depending on the pressure-difference. I'm sorry for any confusion caused by my error.


UPDATE (20th June, 2011):

Incoming information provided by Andy Howard (Product Designer, Lifemarque Limited)...
Please find some spec. details for the Downlight 900 that you are interested in:
Shell fabric: 300T nylon diamond ripstop and 290T nylon 6 corner ripstop
Lining fabric: 300T nylon diamond ripstop
Filling: 80% grey duck down, fill weight: 300g, fill power: 500g/m2

ITMA

Posted by on June 4th 2011 in My reviews, Shiny new kit
Tags:

Time for more kit reviews. Adam Smith, formerly of Fitness Footwear, is now batting for Go Outdoors. He's starting a new programme of product reviews and he's asked some of us bloggers to test, compare and contrast some kit.

After much deliberation I chose to review a sleeping bag. I'd narrowed it down to a choice of two - both Lifeventure Downlight bags. My preference was for the Downlight 900 as it ticked all the boxes for what I would use for warmer-weather high-up wildcamping where there's always a risk of adverse conditions, but it was over-budget so I opted for the Downlight 600 instead, figuring that I could supplement the reduced insulation by layering-up if necessary.

After all that, it turned out that the 600 wasn't in stock at the warehouse. I don't know how many strings he pulled, but Adam arranged to send me the 900 instead and despite it being over-budget, he wouldn't accept my offer to pay the excess. Cheers, Adam!

The bag arrived today and it looks like an interesting bit of kit. I'll post an initial review with some pics and data sometime soon.