
This item has been supplied by Christoph Hitchin, representing idealo.co.uk
The tent being reviewed is the 2012 version of the Vango Banshee 300, the idealo link is here and the Vango link is here.
It's been pitched on the lawn for a while and that's given me time to have a good look around and inside it, already I have the feeling that it's going to be as good as, if not better than, previous Vango offerings in the same price-bracket. The spec's good and the features are generally well-presented.
Let's start at the beginning - what do you get and what does it weigh?
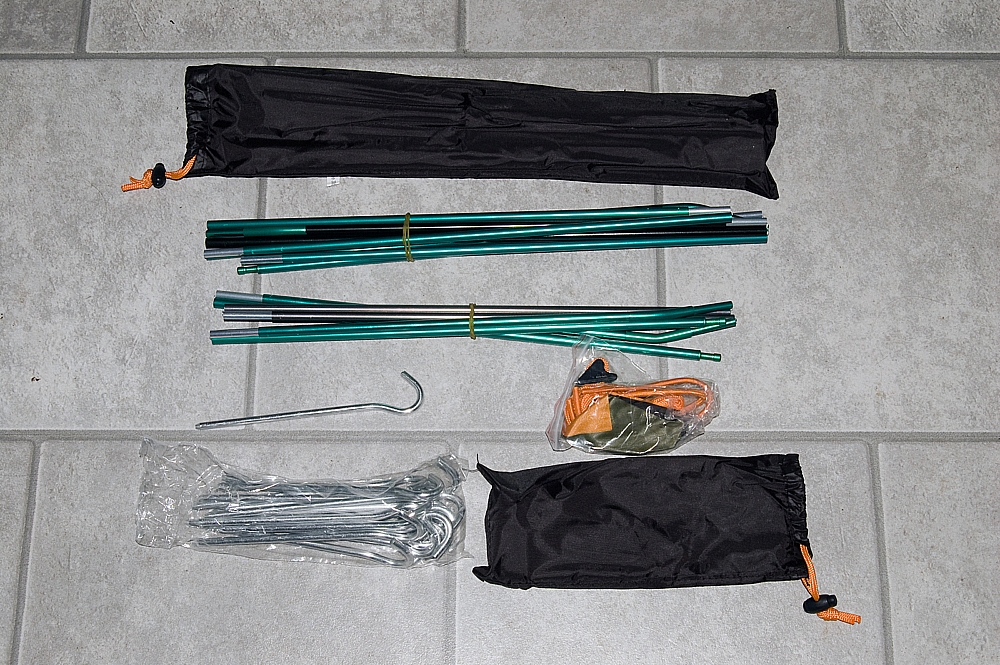
- Fly: 1270g
- Inner: 898g
- Tent-bag: 73g
- 17 Pegs: 252g
- Peg-bag: 8g
- Poles: 352g
- Pole-bag: 13g
- Spares-pack: 22g
That's a total of 2888g which compares well with the published claimed weight of 2.75kg. It's not bad for a split-carry between two people - about 1.45kg each - an Akto comes in at more than that. For those who prefer imperial, 2888g is about 6lb 6oz. Price-wise the tent's a bit variable - the MRP is £140 but I've seen these on sale for around £75 recently.
Putting it up was a doddle, it's hardly rocket-science. For the terminally-inept there's a crib-sheet .pdf file online and there are three sheets of printed instructions sewn to the inside of the compression-bag. Pitching took 10 minutes first time out, that included attaching the inner and faffing with the lines. YMMV. It pitches outer-first or all-in-one, the poles and pole-sleeves are colour-coded and you'd be hard-pressed to get it wrong, there are only two poles and they are significantly different lengths so they won't fit in the wrong place. The pegs are standard Vango-issue ally hooks, fairly strong but they will bend if mistreated, unlike the harder-and-lighter top-class versions issued with my F10 Spindrift. There are webbing straps between most of the pole-ends which means that the pole-spacing should end up dead right every time (but read on...)
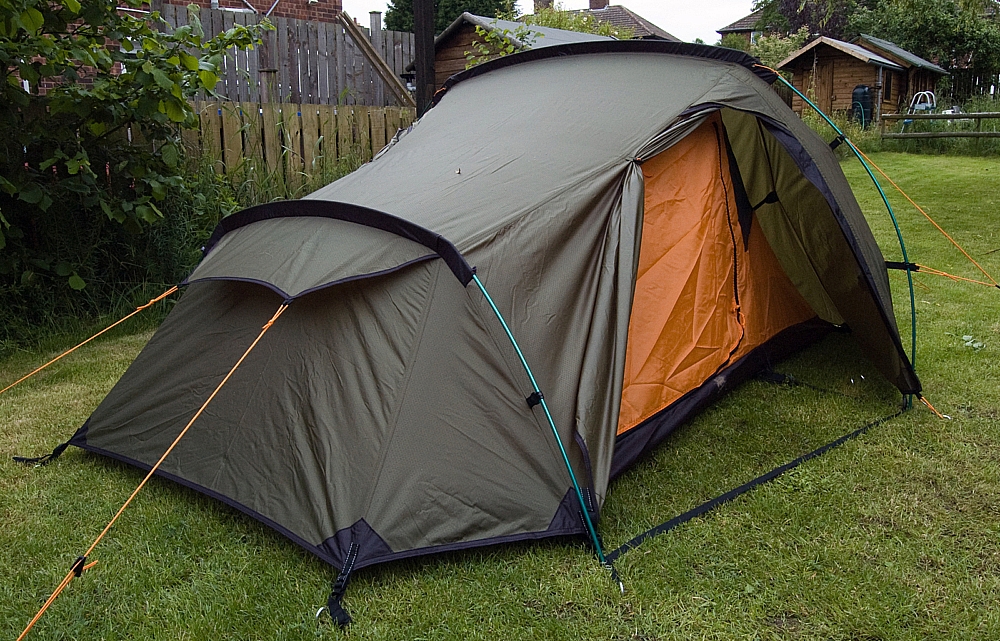
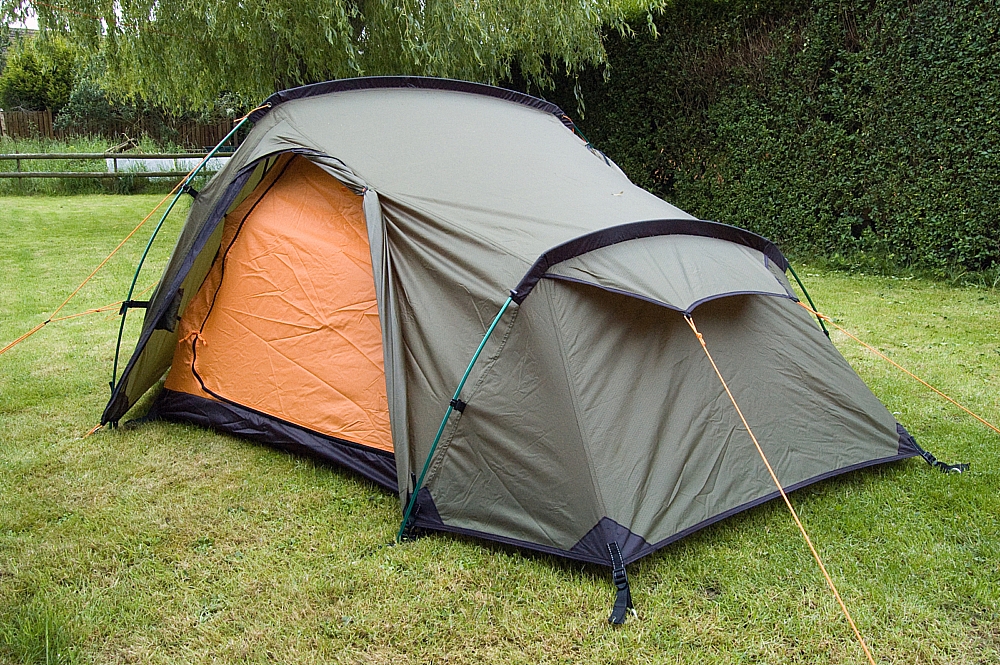
Anyway, here's what it looks like closed-up:
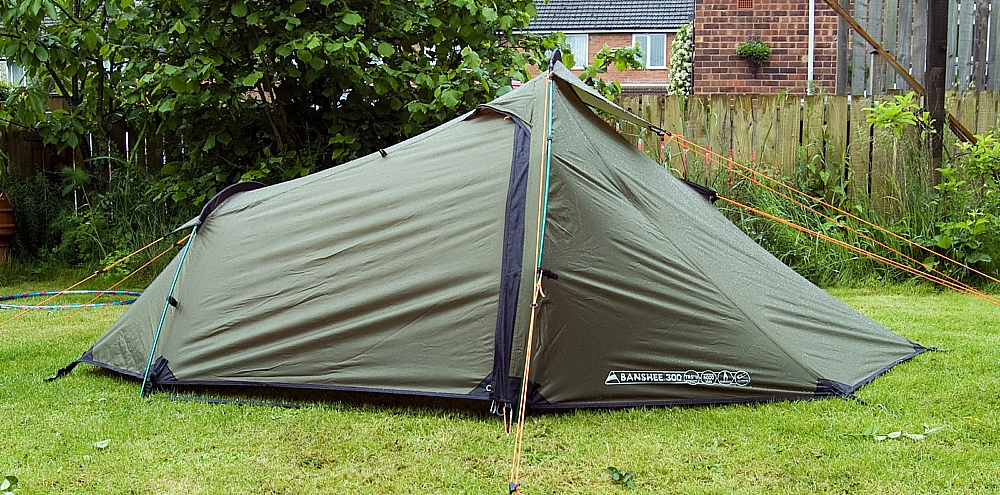
Side
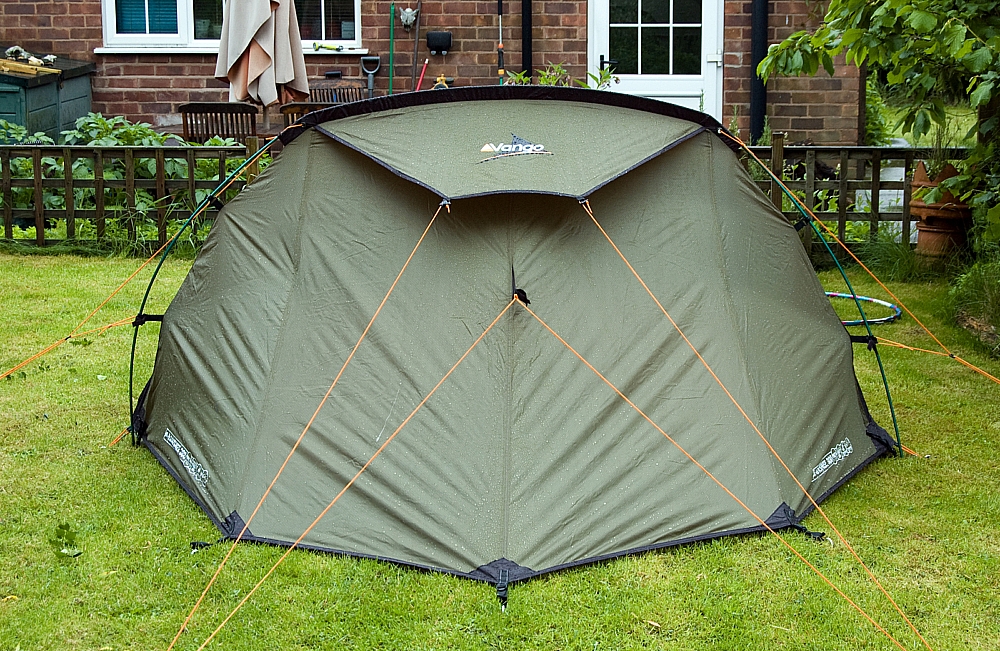
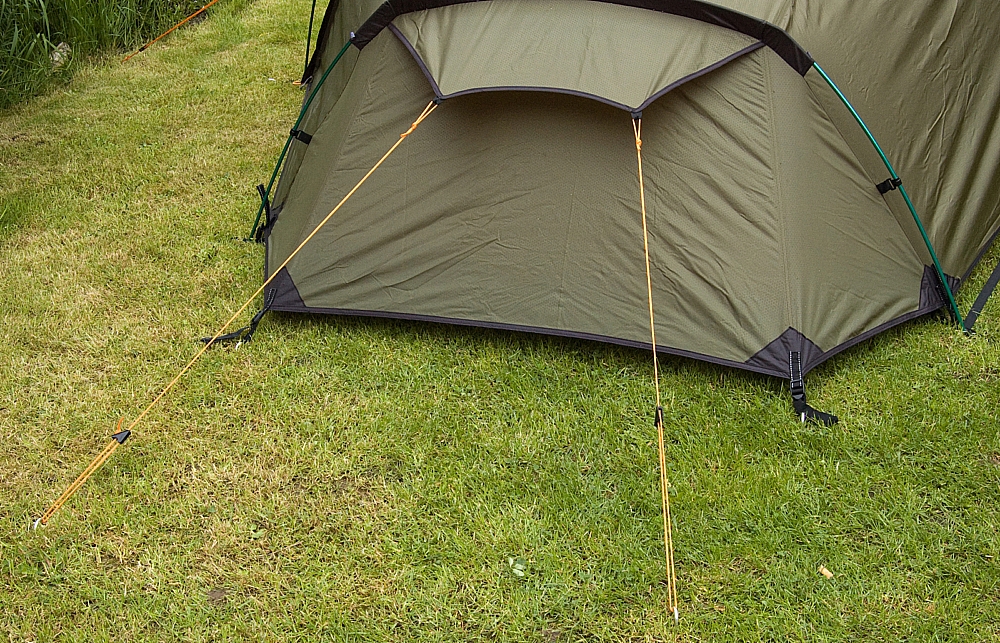
Front with original (dodgy) guy configuration
Rear with original (dodgy) guy configuration
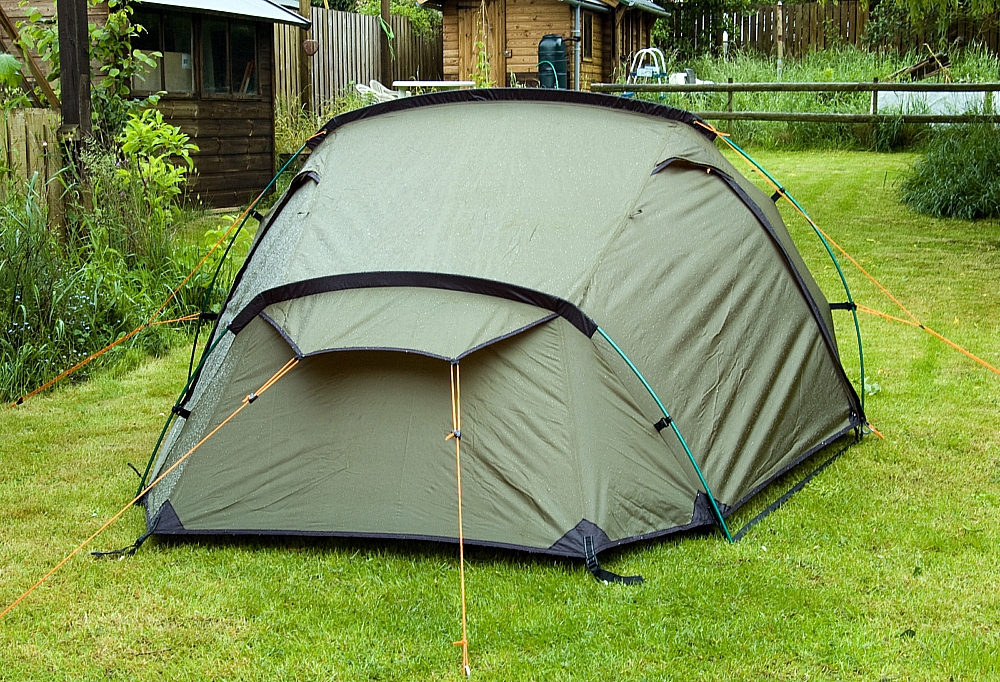
Rear with corrected guy configuration
You'll note the minor gripe about how the end-guys were attached. It's probably just me being a tad fussy, but I don't like running lines passing through static fabric loops - every re-tensioning saws away at the loops and eventually they fray, it's worse with icy lines. Far better to have static lines in static loops, IMO. I've corrected the lines at the rear, I'm waiting on some bits so as I can correct the ones at the front. The side ones were fine.
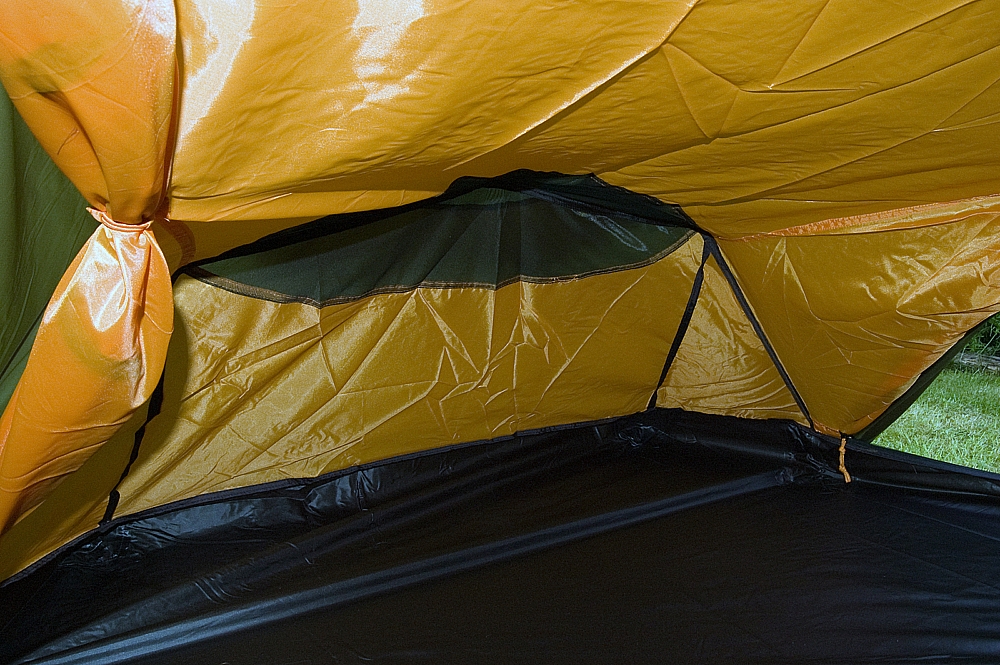
Those front and rear lines don't just hold the tent up, they hold up the vent-flaps too, and the front lines also steady the front wall where the inner is attached. The mesh vents are always open, there being no means of closing them, but they are well-protected:
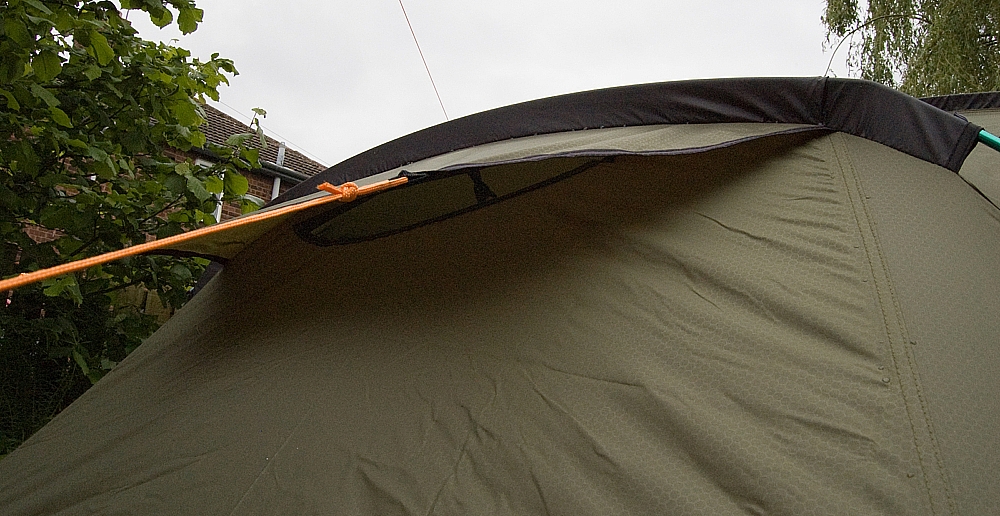
Rear mesh vent
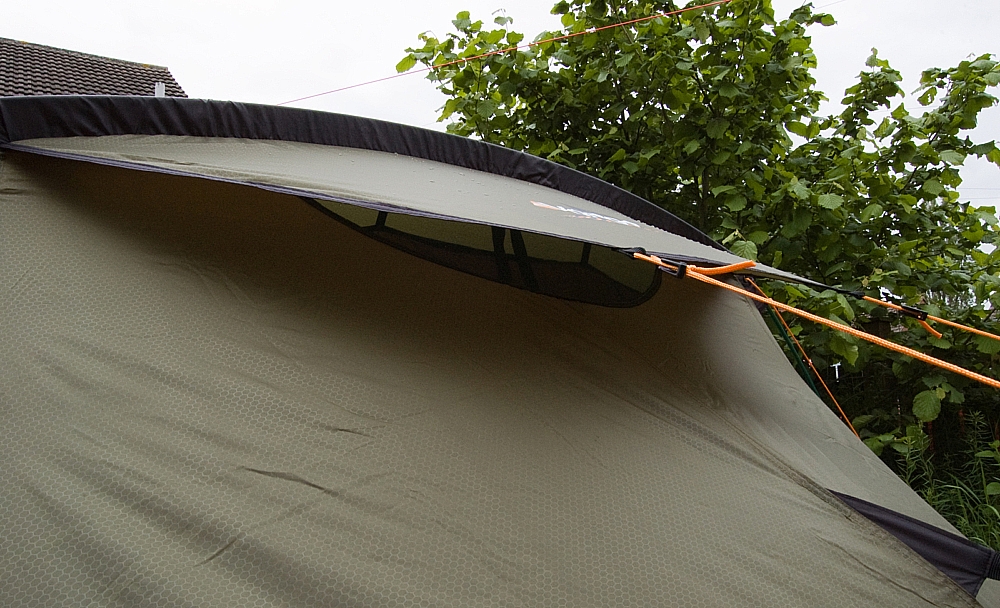
Front mesh vent
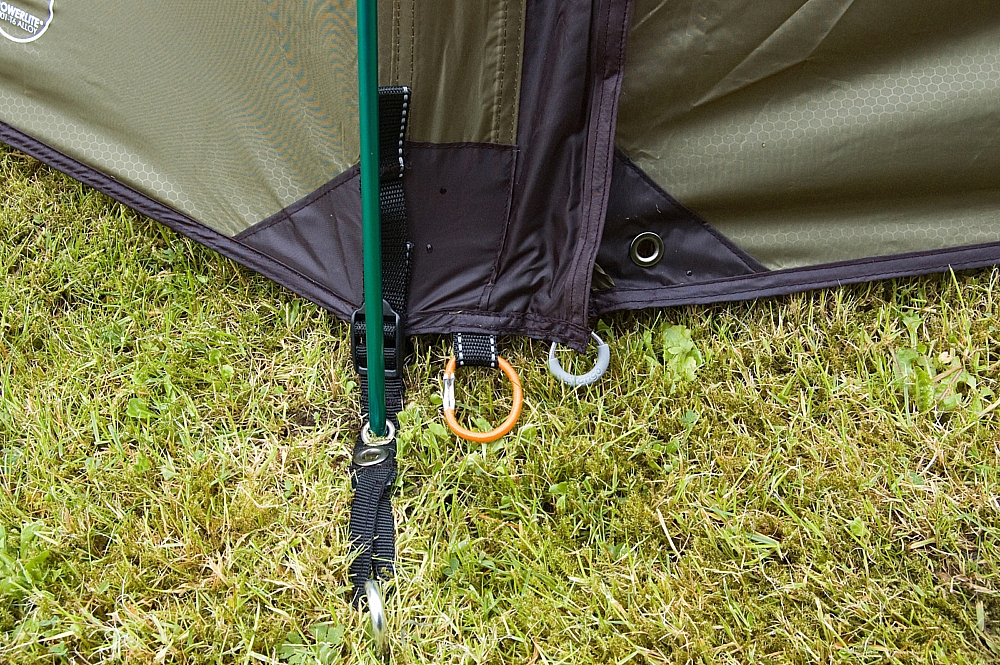
Unlike the tent pictured on Vango's website, all of the fly's nine main pegging-points are tension-adjustable via reflective-webbing and buckle arrangements:
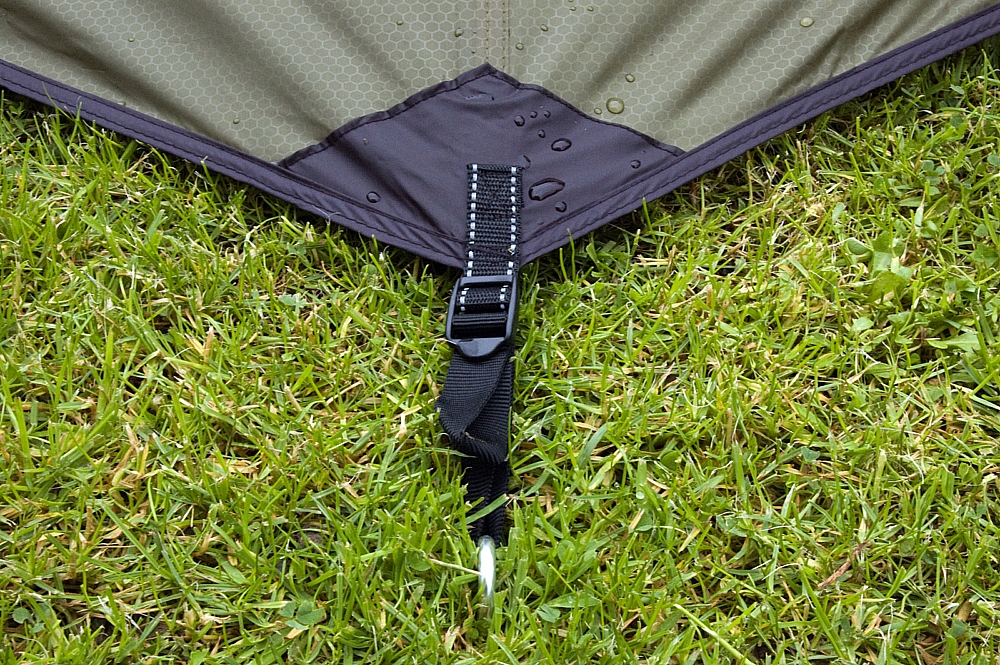
Adjustable pegging-point
It was while looking at these pegging-points that I noticed that the seam-taping was a bit errant - in some places the edge of the tape was very close to the seam-stitching. A thorough check of the fly's taping was conducted and this was the worst bit. It's OK but only just:
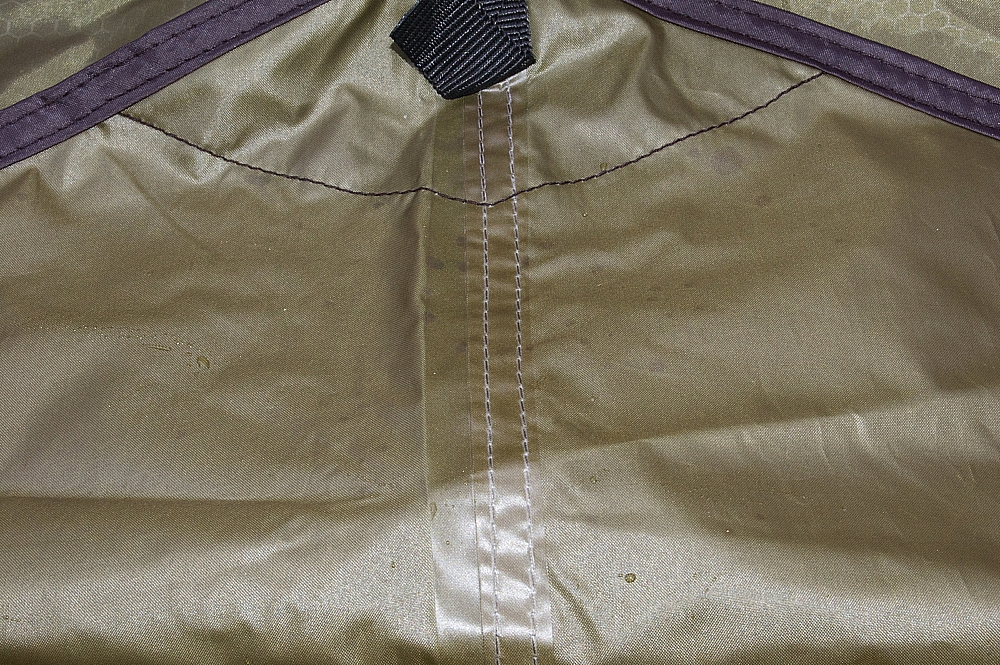
Seam-taping could have been done with more care
There are orange bungee-loops at the bottom-edges of the fly right next to the entrance-flaps. I'm told that they're for the handles of clacky-sticks if you have a mind to prop open the flaps in fine conditions, the points go into the metal eyelets. Guying-out the clacky-stick would explain the two unused pegs:
Orange loop
Also shown above is one of the neat zip puller-loops on the fly, here's a better view:
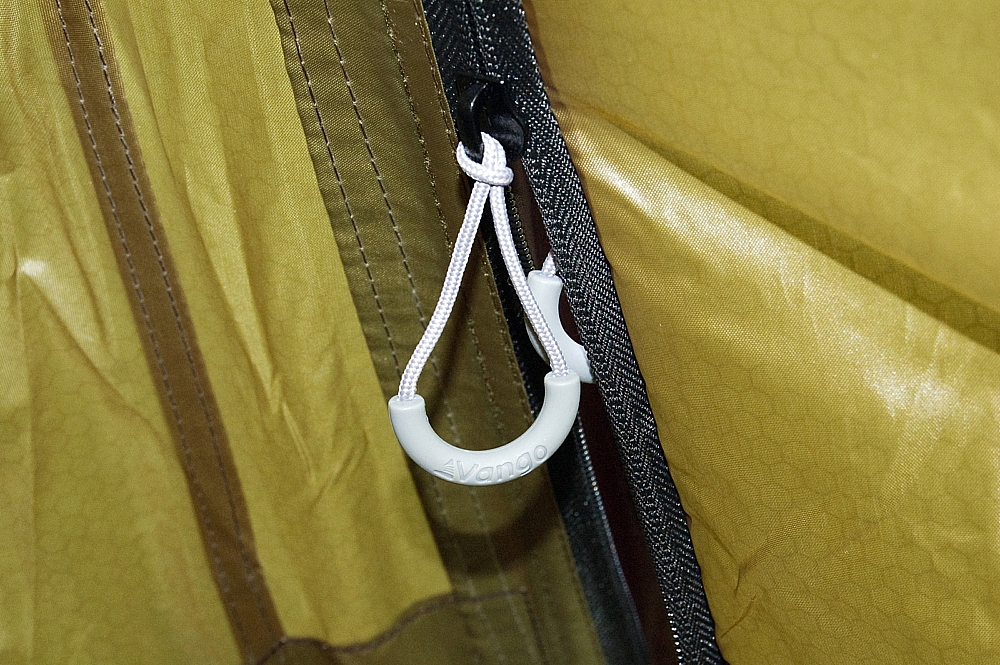
Fly zip puller-loops
I like these puller-loops, they feel good and they stay open and finger-ready (unlike fabric or shock-cord loops) but they'd have been better if the cord that they're moulded onto was of the reflective variety. Sadly these puller-loops aren't fitted on the inner's zips or on the top pullers of the fly's zips, where cord-loops are used instead. A trick missed, I think, and hardly a budget-breaker, but it wouldn't be a deal-breaker.
Still, the zips are all of good quality and the double-ended fly-zips allow venting under a cowl at the top-end of each entrance-flap:
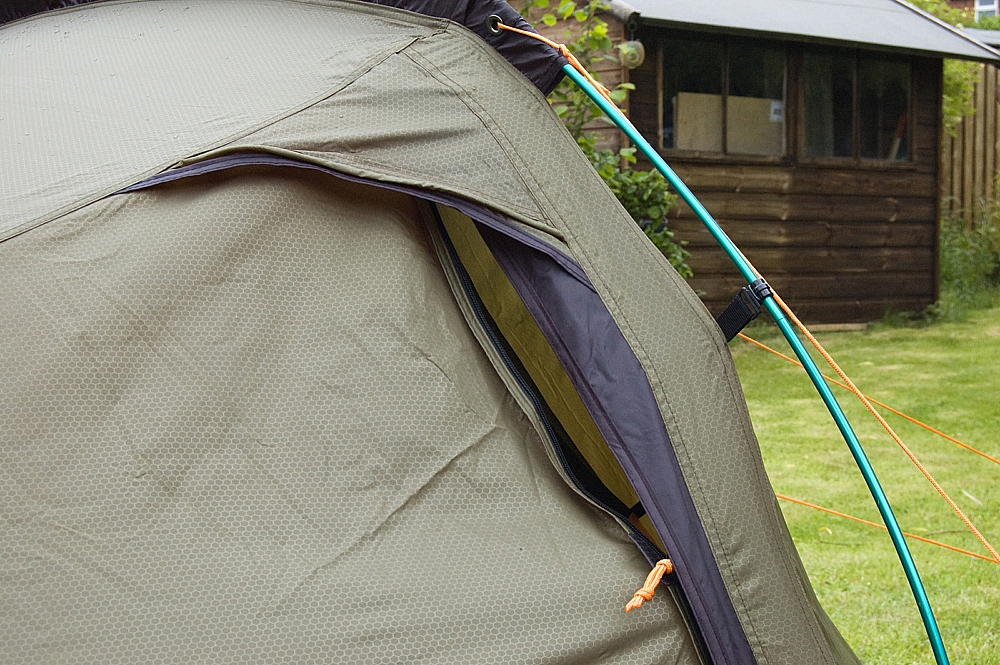
Cowled venting
So, let's see it in the full with the flaps open and toggled-up:
The main entrance showing a reasonable area for storage or cooking
The secondary entrance
So, have you spotted the problem yet? Maybe this next pic will make it more obvious:
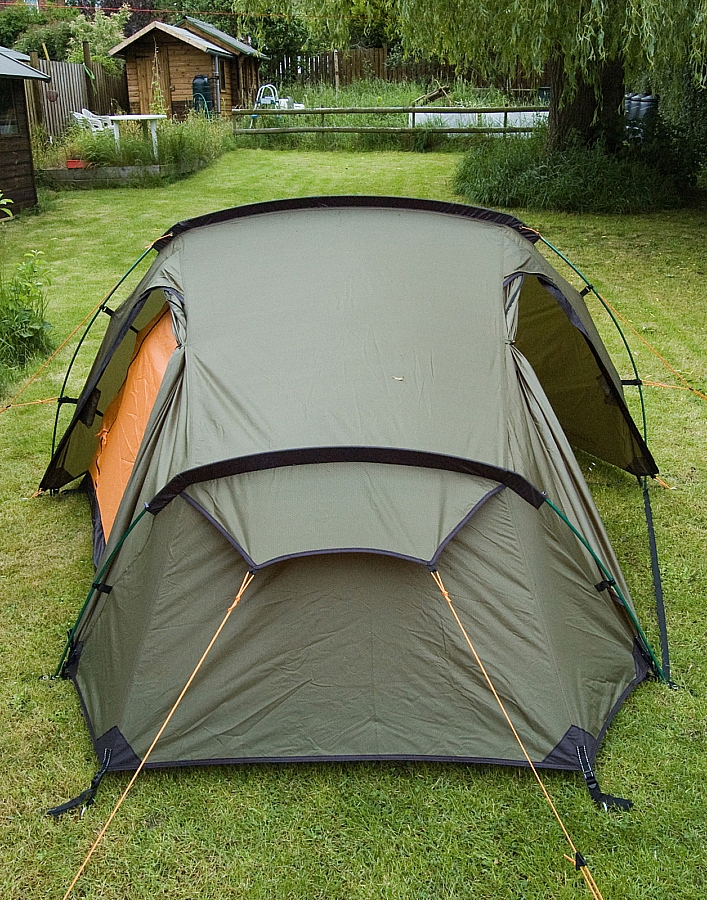
Both entrances in view
Yep, there's no webbing-strap across the secondary entrance. In order to get a taut pitch the pole-spacing must be correct right at the start or the secondary entrance either flaps or pulls apart. I've a mind to retro-fit a strap, I reckon I've got a suitable bit of webbing somewhere. Would have saved me some effort if it had been right first time though.
You'll be wanting a look inside, I suppose.
The inner is predictably saggy in parts, it's a design-constraint, it can't be fixed to something that's not itself fixed or taut. The inner hangs from under the pole-sleeves and is clipped or toggled to the fly in various places. To be fair, it's less saggy when the inner flaps are zipped up but I needed them open for these pics. The groundsheet is of the bathtub variety but it's a shallow bath - two inches max. The inner walls and ceiling are well-designed and there's good headroom for sitting in comfort provided you're not over-tall. The head end is part-mesh so the ventilation is good. There are four basic mesh storage pockets and zipped access to the space under the front end of the fly. This access has two covers - mesh and full-fabric - and so can be used as a further vent:
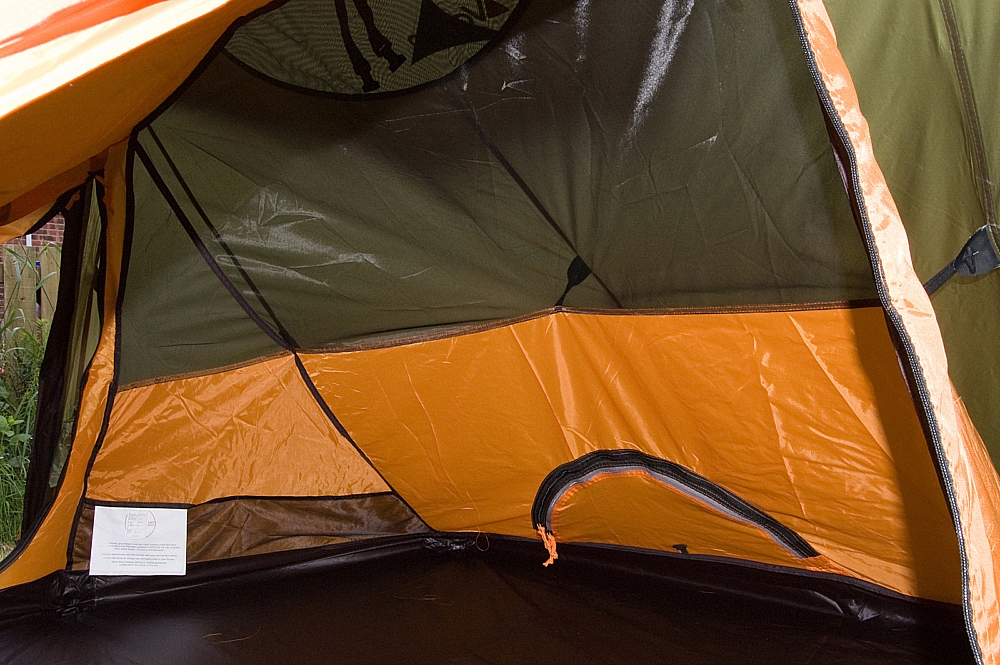
Head end detail
The foot end is basic, it's wide enough for two kip-mats, there's another mesh panel and there's good clearance for big feet:
Foot end detail
There's not much more in there. There's no gear-loft or hanging-loops. The TBSII "Tension Band System" bands pass through the inner in the same vertical-ish plane as the main pole, I haven't deployed the system yet and so can't comment on its effectiveness or on its intrusion into the inner space.
It's quite a big tent, wider than I'd expected. It's billed as a three-person shelter but I think that's pushing it a bit. It would just about cope with three in an emergency and with most of their gear left outside, but if comfort's your thing then two-plus-gear would be about right.
Use the fly without the inner and you'd have plenty of room for three. And you'd have 898g less to carry. Maybe I'll give it a shot sometime.
In order to give some sense of scale I decided to deploy our very own Banshee:
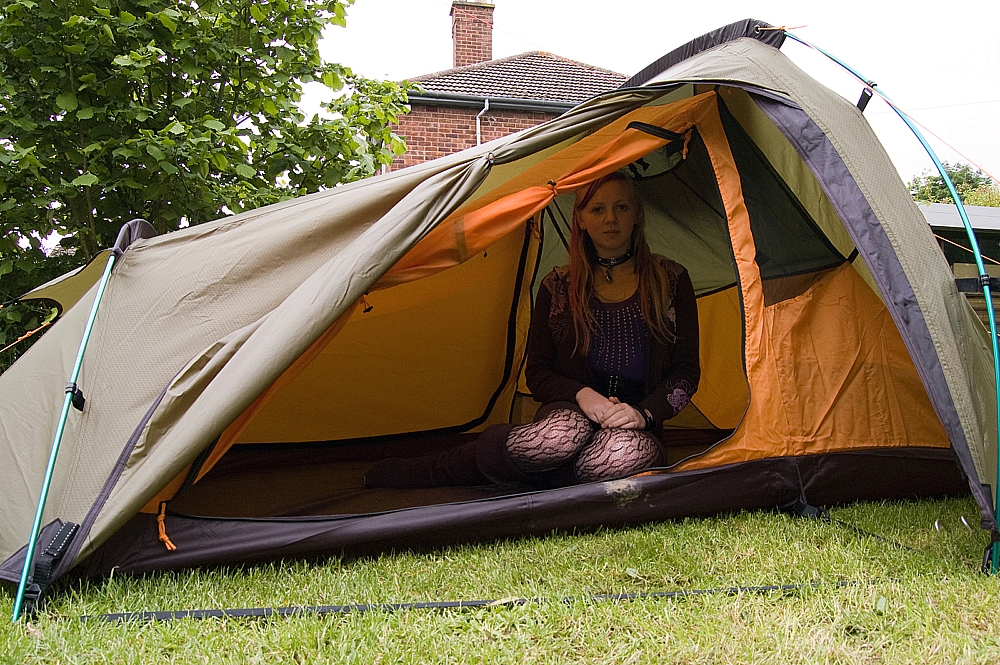
Sitting
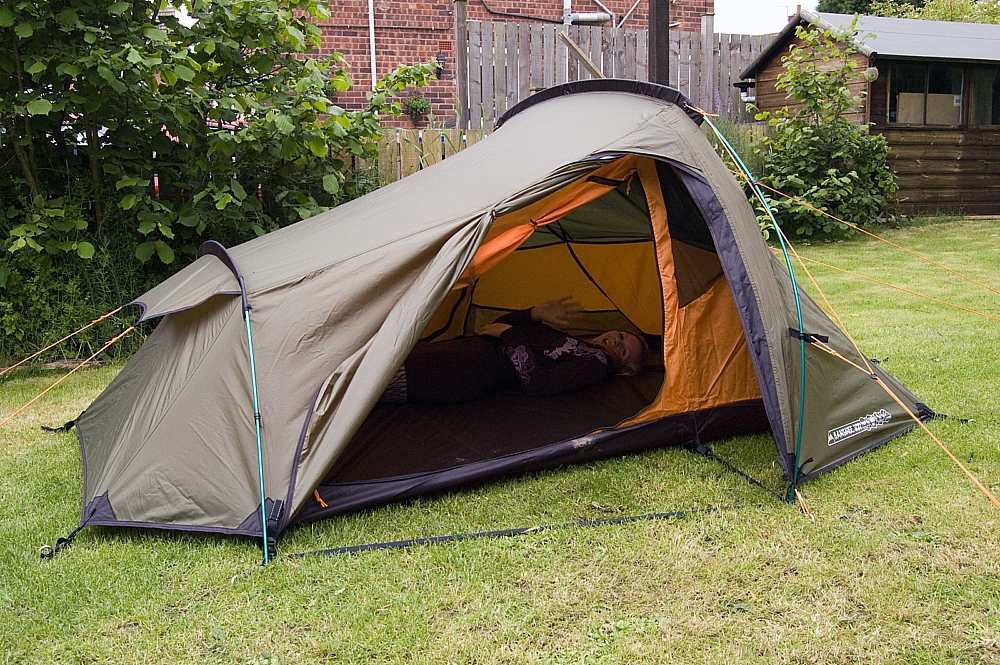
Lengthways
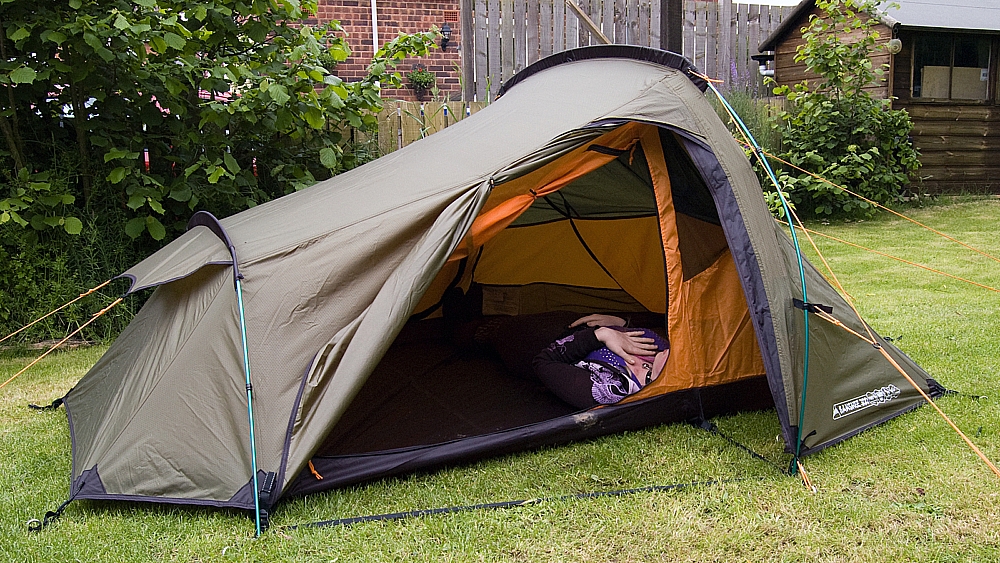
Widthways, just for the hell of it
The storage bag is of the side-compression type and it has an effective drawcord closure. There was a length of webbing that connected each compression-strap and acted as a grab-handle, a nice touch but I've removed it as I can foresee no use for it.
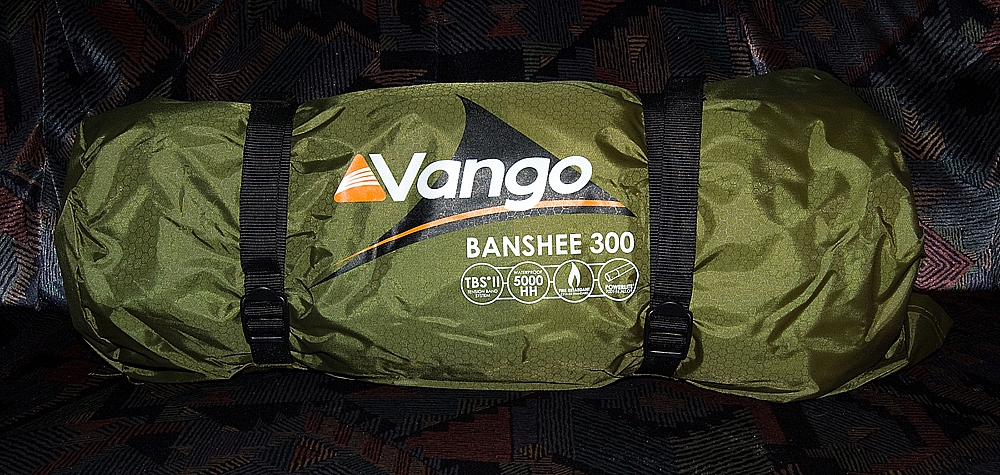
Compression-bag
So far the tent's been out in some heavy rain and the fly sheds it well, directing it away from the zips and vents. Apart from the minor issues with the way the thing's been guyed and the more serious problem with the omitted webbing strap, I'm really impressed with this tent, I reckon that for the price it's well-specced, reasonably light and it'll be about right for two folk on the hills. I'm looking forward to seeing how it fares with me spending a night in it, but that'll be a tame garden-camping test. We're scheduled to take it on a wildcamp some time in the next few weeks when it'll see some proper action in the treeless wastes of Skiddaw Forest.
The big unknown is whether Chris will like it. She's used to the luxury of our 6kg 2006 F10 Spindrift which is bombproof, spacious and taut inside (pitches inner-first), and well-equipped with storage spaces at every turn. I've a feeling that for her, going lighterweight and downsizing is going to be quite a challenge.


Vango seem to be on a resurgence at last. The Helium range being particularly good.
It’s a good first review Stef with comprehensive photographs, thanks. The outer material looks like it’s the same as Exped use on their sleeping mats.
@AlanR - Cheers, Alan.
The hex-pattern of the outer looks odd at first when you're used to seeing the square-grid of a typical rip-stop weave. The fabrics's allegedly made from recycled plastic bottles. Vango's blurb says it's a "premium PU coated polyester fabric which is coated to a number of different levels of waterproofness dependant on the type of tent it is to be used on. Polyester fabrics, if compared to similar nylons, have greater elasticity and hence are less prone to ripping if you trip on a guyline or pegging point. In addition because polyester absorbs less water than nylon, the tent will sag less when it gets wet".
OK, so it's rip-resistant, but is it rip-stop?
It's good little tent.We bought one of these for backpacking the Cleveland Way (completed yesterday) and despite being pitched in appalling conditions stood up well to the wind and rain and was always dry inside. You do need to get the guys right and your mod looks useful.
Best used for 2,with large packs it gets tight for room inside even then.
HI, how did you get the front bit pegged out so it is taught? no matter what i try the front section, because it only has 2 webbing straps, is always a bit flappy and loose!
@Harry - I pegged it in the following order:
1: Pole-ends
2: Rear-end pair
3: Front-centre
4: Remaining front pair
5: Rear-vent pair
6: Front-vent pair
7: Main pole pair
Too much tension on the front-vent lines will pull the top down and make the front saggy.
I've since reguyed the front end - see https://beardedgit.com/?p=8147
Hope that helps.
Thank you! but do you mean the "front" to be the smaller end with only the 2 straps? just clearing things up cheers!
@Harry - Maybe this makes more sense:
1: 4 x pegging-loops at the pole-ends
2: 2 x foot-end pegging-loops
3: 1 x head-end centre pegging-loop (see *** below)
4: 2 x remaining head-end pegging-loops
5: 2 x foot-end vent guys
6: 2 x head-end vent guys
7: 2 x main pole guys
*** The Banshee 200 has two pegging-loops at the head-end, the Banshee 300 has an extra one in between.
yeah that makes sense now, thanks!
Hi, Could you tell me how long the poles are? I need to fit them into a separate bag (which I also still have to buy). Thanks.
@Jeremy
17.5 inches (445mm) max.
The poles should have a separate bag when new (see the first picture in the post above). If you're missing the bag, get in touch with Vango and see if they can sort one for you. Last time I needed some bits I contacted Vango via the "Repairs" section at http://www.vango.co.uk/after-sales.html and ended up dealing with Andrew Mooney at AMG Customer Services. He's a nice bloke, when I needed some odds and ends for reguying my Banshee 300 (and some other Vango & F10 tents) he sent me the bits and wouldn't accept anything for them, not even the p&p!
Just to clarify, is 445mm the maximum length all of the poles bunched together, or just an individual pole? I say this because previous Vango tents I've owned have had some poles longer than the others, creating a staggered bunch which is actually longer than any individual pole.
@Jeremy
It's the length of the staggered bunch, pretty much as you can see in the picture above. I've found no way to make the bunch shorter as it's necessary to have one end of each elbow section inserted into one of the adjacent straight sections.
YMMV, especially if they've changed the relative lengths of the straight sections when they release a new version of the tent, but it's a safe bet that the pole bunch will be no longer than the length of the main tent bag.
Okay, thanks a lot 🙂
@Jeremy
No problem, happy to help 🙂
Great review, it's people like you that help us out. Keep up the good work and well done. 🙂
I know one of the 2012 listed features is:
Walking pole attachment eyelet in door
I believe the orange loop you found is most probably to go around the handle of a walking pole, and then the tip of the walking pole would go through the eyelet hole in the flysheet door, thus keeping it open for cooking?
Any chance you could measure the foot end width as this information is impossible to find - I know you state wide enough for 2 mats
Thanks for a great review.
I now need to decide if I get the 2012 version you review here, or if the 2013 version makes more sense - just need to find somewhere with one on display to have a poke around.
@Jamie - Ah, I'd not considered that the orangey bit would be for a pole-handle. Thanks for that, it all makes sense now. You can tell that I'm not a pole-user (except when using snowshoes). I've edited the post accordingly.
As for the width of the foot end of the tent, I'll dig the thing out and slap a tape across it sometime this evening and report back soon afterwards.
@Jamie - Here you go, I hope it helps:
Hey!
Thanks for a great review. I am also considering buying a Vango tent, but I am not sure which model to get. I am deciding between Banshe 300 or Spectre 300. I will be using it on my motorcycle trips with my girlfriend and I was wondering if it is large enough for 2 and some gear. Have you tried out the Banshee and can point out some pro's and con's? Did you retrofit a strap across the second entrance?
Thanks for your help!
@Ghosty - If the bike's doing the carrying then I'd go for the Spectre 300 rather than the Banshee 300. Both will take 2 with gear, and both have the same inner length. The Spectre's heavier but it's got extra height and storage at both ends. BTW, the 2013 incarnation of the Spectre is the Sabre. Looking around on the web, there are some good prices for 2012 Spectres.
Pros and cons? Depends where you like the highest point of the inner. In the Banshee it's at the head-end so plenty of room above your head when asleep but when you sit up you tend to stay at one end. In the Spectre (Sabre) the high-point is in the middle - a better for sitting up - but when sleeping the inner can feel quite close. Swings and roundabouts!
I did retrofit a webbing strap to the Banshee, it made pitching much easier. I've had a couple of nights in it solo, seems fine to me.
Hope that helps.
@BG! -
Thanks for your help! Do you know if there are any big differences between 2011 and 2012 Spectre 300 models? I found a 2011 version for GBP100 while 2012 sells for GBP130, which is a bit to much when I add postage. How is the orange interior, is it very bright during the night? I am asking this because I once had a tent that was brighter on the inside, when the moon was shining, than it was outside and would like to avoid that for a better nights sleep
Thanks!
@Ghosty - Sorry, no idea about the differences between 2011 and 2012 Spectre 300s. Try contacting Vango by email, they're a helpful bunch of people and usually you'll get a swift response.
As for the orange inner, it very much depends on the colour of the fly... my Banshee has a green fly and the orange inner is fairly dull at night. My Spectre has a black fly and the orange inner just appears grey. Of course, when you light up the inside of either it's like being inside a Belisha beacon!
FWIW: Spectre 300 < £100, free p&p
Thanks for the review. I've also got a Banshee 300 - but couldn't figure out how the webbing guy lines worked. I put the peg through the end loop and tried to tighten by pulling the middle bit - within a few minutes it would always work itself loose again. After seeing your photos I've now figured out that you make a loop in the middle to put the peg through, then tug on the end loop and it will stay nice and tight.
Just ordered one of these. Really appreciate the detailed review, it helped me make the decision. Unfortunately, the Vango Banshee is not available in the USA, but the design and how well it handles UK weather made it worth the extra shipping and trouble. I'm an Assistant Scout Master with the Boy Scouts of America, and we take the scouts camping every month. We are planning a lot of weekend hikes for 2015 and in the BSA we go rain or shine, so i needed a good, light weight, all weather, backpack tent.
[…] experiences and advice, and during the winter purchased a lovely, lightweight tent – the Vango Banshee 300 for the princely sum of £45 in the sales. I also bought an Alpkit sleeping bag and sleeping mat […]
Just returned from Glastonbury where my Banshee suffered two failures in the upper joint of the two lower main pole sections. The pole is at it's most stressed at this point. You can see in the review pictures that there is a considerable deflection of the pole when erected which creares a shear force around the lower joints. Take care when erecting and entering or exiting the tent not to place further loads on this pole. We have used the tent on a dozen occasions since spring 2014. I have read elswhere a recommendation that the inner be attached after erection as this can reduce the loading. Replacement cost £23 from Vango.