Podcast Bob's been kind enough to let a select group of folk have test-samples of his new Honey Stove, and I'm one of the lucky ones. These are my first thoughts, and the results of my first attempt at testing it.
What's in the kit? A set of interlocking flat stainless-steel panels, comprising six side-panels (one of which has an aperture for accessing the interior), three grill panels (top, middle and bottom), a foil ash-tray, a cloth pouch and an A4 instruction sheet.
How much does it all weigh? The stove panels add up to 356g, the ash-tray is 10g and the pouch is 44g.
How much pack-space does it take up? Packed in the pouch provided, it's roughly 200mm x 140mm x 10mm.
And when it's assembled? 125mm high, 125mm A/F.
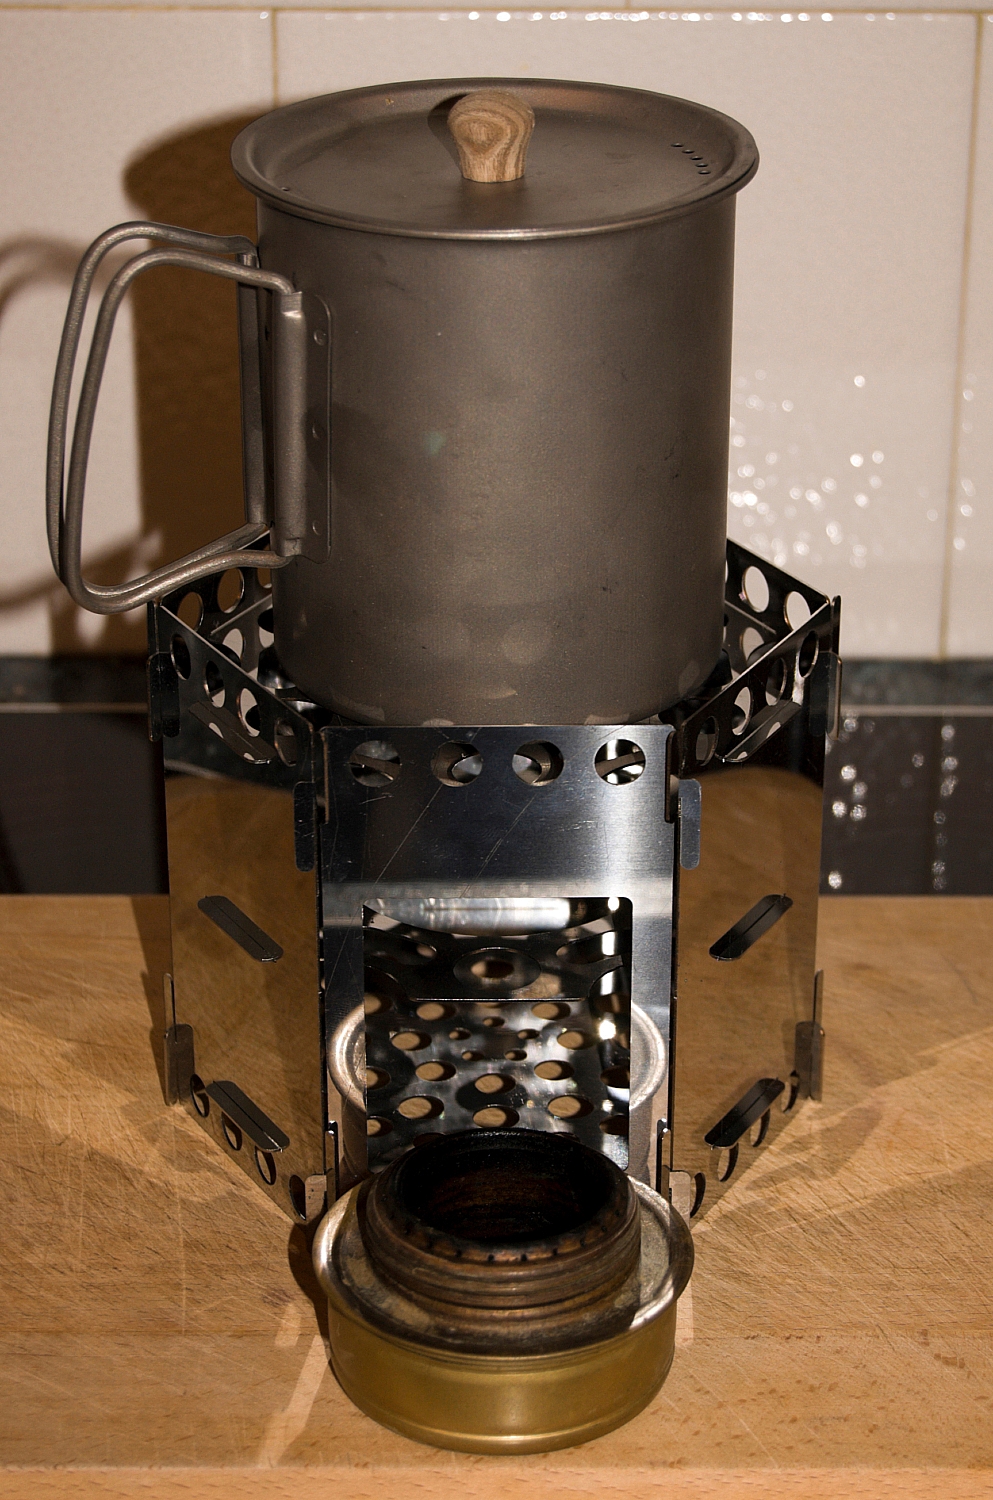
What's it look like? A bit like this:

Is it fiddly to assemble? Not really, I just slotted together the five standard side bits and held then in an open arc while slotting in the three grill panels. After that, I just slotted in the front panel to lock it all together. It takes 2 minutes tops, but I'd imagine that after it's been bent and dented a bit it would take a bit longer. If you can't figure it out, give it to some primary-school kids and be prepared to be embarrassed.
What about stability? Very good on a flat surface, not a hint of it wanting to come apart.
So, what fuels will this baby burn? It's primarily a wood-burner, but it's said to be versatile enough to work with a veritable plethora of fuels, see the product description for more details.
What's the difference between the three grill panels? The bottom one has small vent-holes and is primarily for supporting sticks etc. when using it as a wood-burner, but can be used for other solid fuels. The top one is a pan/mug support, so has plenty of holes to let the heat get through. The middle one is similar to the top one, but has the central section removed to allow a Trangia™ burner to sit inside. The three grill panels are interchangeable, as they each use that same tab/slot fitting. It's possible to get away with using just one grill panel if you wanted to go all minimalist, but if that sort of thing floats yer boat I suspect that you'll already have other options in your kit-stash. This stove is aimed at versatility rather than speciality.
That sixth side panel - does the aperture have to be at the bottom? No, just build the thing upside-down and you'll end up with the aperture at the top.
What about cleaning it? Eh? You clean your kit? Oh dear! Seriously, a wipe with a damp rag or through some wet grass ought to suffice. Of course, you'll have let it cool first, won't you?
So, what about that first test? I wanted to try it with my Trangia™ burner and Alpkit MytiMug, so I set it up like this:

So, how did it go? Not well. The front aperture's nowhere near big enough to admit the Trangia™ burner. Bob's site has pics and a video where the burner's been put in from the top, and where the top grill is omitted. Fine for pans and large pots which would sit on the top edges of the side-panels, but a mug needs a support. I suppose the mug could be supported by two tent-pegs passed through some of the holes along the top edge, but I'm not in the habit of carrying extra pegs as part of a stove kit. The way around it might be to build the stove around the burner, but that's a faff which throws up more hard choices - sealing-cap off and risk spilling the meths, or sealing-cap on and be unable to reach in to take it off. Either way, if you want to use the Trangia™ simmer-ring, you'd be hard-pressed to access it through the aperture and you'd be at risk of getting blistered fingers.
What next? I was going to try it as a wood-burner next, but I want to get the Trangia™ issues sorted first. Looks like my chosen test combi is a no-no at the moment. I'll post again when there's progress. Now, who's 'alf-inched me tinsnips?
THE SMALL(ish) PRINT... (updated 23/07/2016)
By submitting a comment to this blog you grant me permission to reproduce its content and to reproduce the submitted name/URL in attribution. I will leave your content in its intended place and in its unedited form unless one or more of the following apply:
If you ask me to modify, move or delete your content, I’ll consider making the requested change(s) so long as there’s no significant alteration of the context of the content or of any debate associated with it;
If you change your email address or URL, I’ll update these details in older comments so that I'm not displaying dead links;
If I decide to change the theme or layout of this blog, thus affecting the placement and/or visibility of comments, I’ll make whatever changes I see fit for the smooth running of this blog;
If any comment contains insulting profanity or other content which I deem to be causing or likely to cause trouble, I’ll edit or delete as I see fit for the smooth running of this blog. I’ll try to remember to display the reason(s) for whatever editing I do, so that folk aren’t left hanging wondering what happened and why. If you can at least try to "disguise" your swearing, it would be much appreciated.
Other things to consider:
Comments must contain at least 3 characters;
You can use some code in comments, feel free to give it a shot and see what works;
If adding pics, the recommended maximum dimension is 600px.;
Comments containing many links will be held for moderation;
I reserve the right to amend this policy in line with proven applicable current legislation;
Free Speech: you may well have the right to it, but you've no right to compel me to a) listen to it, or b) publish it!


gosh your myti looks clean ^__^
@Weird Darren - Yeah, I just let the tannins build up layer-by-layer and then peel them off in one go once a year.